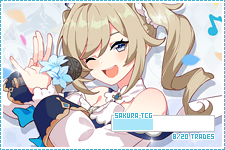
v2 Trade Meters

If you'd like to use the v2 Trade Meters and want to make your own but need some help figuring out how to use the template then this is the tutorial for you! Once you've made some and you're interested in sharing them for other players to use, please post them over on the forums. We do have a specific format for sharing v2 Trade Meters though, so make sure you read the information thread if it's your first time sharing trade meters!
Please note that the the template provided is a PSD because I (Cassidy) use Photoshop for everything but if you're able to open and edit this file in other programs then feel free to do that. This tutorial will be written for Photoshop users however so some things I describe may not be the same in different programs as I haven't tried using others so if your program doesn't have something I mention, it probably has something similar or an equivalent!
TUTORIAL
- Download this template that contains all the layers necessary to make your own v2 Trade Meter! Any layers/groups marked in a colour are ones you can edit and change the images or colours of.
- Please keep the content of any text layers as is (aka don't change/delete "Sakura TCG" or the trade markers text, basically)!
- Different colours were used to make differentiating layers and groups easier but all of them can be altered to your likes as mentioned above.
- Change the image to one of your choosing! The size of the v2 Trade Meter is 225x150 so you can crop & resize your image to that first then paste it into the template. You can also directly paste the image into the template as is instead then go to "Edit" > "Free Transform" and in the settings (mine show up in the top bar like seen below), select the option to "maintain aspect ratio".

This ensures your image doesn't get squished or stretched out when you change either dimension (which you can do by typing in any number in the boxes that say "100%" after "W:" and "H:") or if you manually resize by click & dragging the image from a corner to resize. I find this gives me better control because I can see how much I need to crop or zoom in/out of an image to suit my liking instead of repetitively cropping and resizing back and forth. - You can now start changing colours! To change the colour of all the coloured bar markers at once, change only the Color Overlay option of the group itself, not each individual layer within the group. If you right click on a group and go to "Blend Options", you can see if the "Color Overlay" option is checked off or not; if it is, that means you're editing the correct option so you can just click that and change the colour from there.
- To change the colour of all the text markers (the ones that say "0/20 trades") at once, select all the layers within the group then go to the Character window—or whatever is equivalent/similar in your editing program (see screenshot of mine for reference)—and change the colour from there. To easily select all the layers at once, click the first layer "0/20 trades" and while holding the shift key, select the last layer "20/20 trades"; it will select all layers between the two!

- If you want, you can then add additional decorations and such to the trade meter but please keep the size of the graphic itself the same! Additionally:
- you could also change font and border styles but if you're planning on sharing what you've made, we encourage you to make sure any text is still legible and the trade marker is still clearly visible.
- you do not need to use the same colour throughout the trade meter as well so feel free to get creative!
After editing your trade meter to look how you want, now you need to save the files! While you can definitely open up your trade meter to manually edit and display how many cards you trade, then save and upload it to your trade post each time like a traditional trade/stamp card graphic, we suggest a different method to lessen as much of that work as possible.
SAVING YOUR TRADE METER
To do that, we need to save the v2 Trade Meter like we save the v1 Trade Meter: by saving an individual file for each trade marker. It'll be time consuming initially but after you do it once, you don't need to do it again (unless you make more trade meters) and can just update it as per the tutorial we wrote up here!
For each individual file, make sure that the trade marker displayed corresponds to the number in the filename you're saving it as. If the trade marker is for 4/20 cards traded then the number in the filename should be "04" so it would look something like "trademeter04" - but you can change what you name your trade meter if you'd like!
Just remember that whatever filename you save the trade meter under (ie. trademeter00, yourname-trademeter001_00, etc), you will need to alter the code from the tutorial to match as well but other than that, updating it works the same.
Please do make use of hiding/unhiding layers when saving each trade marker file! You don't need to delete/manually edit each trade marker text and copy/paste coloured bar markers as we've already included everything in the PSD (and if you followed the previous steps then all the colours & etc should already be changed at this point) - you just need to hide the ones not being used at the time > save then repeat for ever trade marker.


